Introduction

Derivation of HTA
HTA for Task 1 - Make a one-time donation (min. RM3.50) for a community that they would like to help
User 1: University Student
https://drive.google.com/file/d/1vpLhCGzoQRPd_Af7V0sFcykzfvJ6EGQM/view?usp=sharing
User 1, a university student, opened the Share The Meal app on their mobile device and proceeded to select emergency aid in Palestine for their donation. After choosing the cause, user 1 decided to donate 1 meal and inputted RM3.50 as the donation amount within the app's interface, indicating the contribution to support emergency aid efforts. Upon confirming the donation amount, user 1 navigated through the payment process and chose to pay using a debit card. Then he provided the necessary debit card details within the app and pressed the confirm button to complete the transaction.

https://drive.google.com/file/d/12sPia3GyXUUWkj_8vkP9eyE2YRwSuofW/view?usp=sharing

https://drive.google.com/file/d/1vw8vPcbR6LBF6m1B971CDRJLVrxtjbsa/view?usp=drive_link
User 3, representing a charitable organization, engaged with the Share The Meal app. First, he investigated all the communities on the homepage before deciding on one community that he was interested in. After discovering the community that he was interested in, he then chose to donate one meal to the needy in Palestine and selected RM3.50 as the donation amount for emergency aid in Palestine. User 3 then progressed to the payment phase within the app's interface. Since User 3 chose to pay using a debit card, user 3 provided the necessary debit card details to complete the transaction by scanning his bank card.

HTA for Task 2 - Generate a report of the user’s donation
User 1: University Student
Video Link of User 1 doing Task 2:
https://drive.google.com/file/d/1vpvSmCd0J7LHXvBSZAgBsnYTU0VRSMu/view?usp=sharing
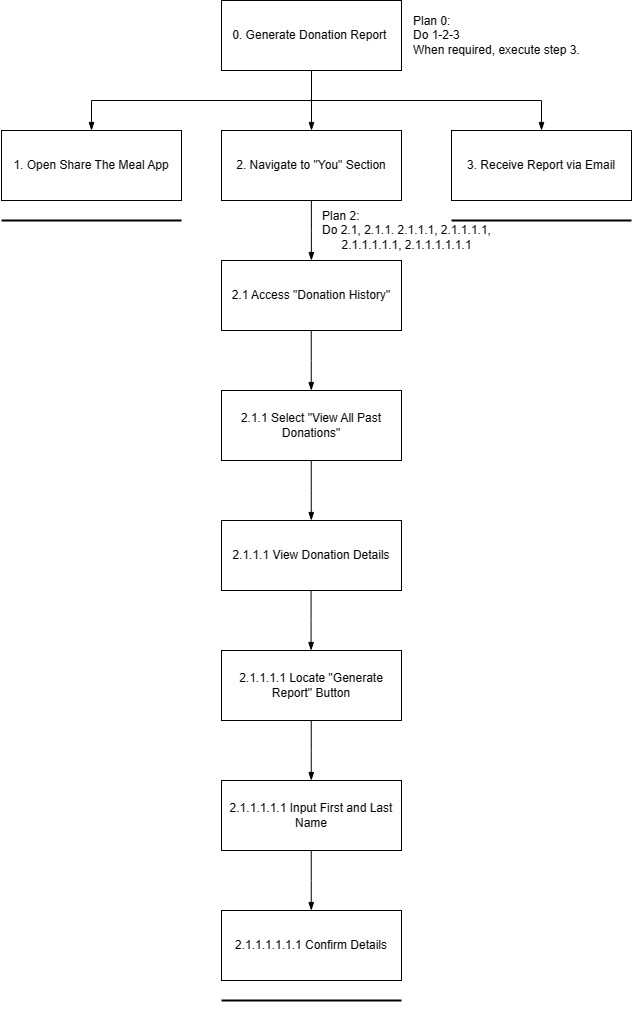
The university student initiates the process by opening the Share The Meal app and proceeding to the "You" section. From there, they navigate to "Donation History" and select the option to view all past donations. Once the list appears, they locate the "Generate Report" button situated in the upper right corner of the screen. After clicking the button, they're prompted to input their first and last name to personalize the report. Subsequently, upon confirming the details, the report is sent to their email address for access and reference.Textual Representation:0. Generate Donation Report
1. Open Share The Meal App
2. Navigate to "You" Section
2.1 Access "Donation History"
2.1.1 Select "View All Past Donations"
2.1.1.1 Locate "Generate Report" Button
2.1.1.1.1 Input First and Last Name
2.1.1.1.1.1 Confirm Details
3. Receive Report via Email
Plan 0: Perform steps 1, 2, and 3.
When required, execute step 3.
Plan 2: Do 2.1, 2.1.1, 2.1.1.1, 2.1.1.1.1, 2.1.1.1.1.1
Diagram Representation:
User 2: Global Citizen
Video Link of User 2 doing Task 2:
https://drive.google.com/file/d/1WqLWrp5EKuZ_EsK33kR198J1lSzbXLeP/view?usp=sharingUser 2, identified as a Global Citizen, accesses the Share The Meal app and navigates directly to the "You" section within the application. From this section, user 2 proceeds to "Donation History" to access the entire log of donations by selecting "See All." Upon viewing the complete donation history and donation details, user 2 locates and taps the "Generate Report" button situated at the top right corner of the screen. Subsequently, user 2 inputs their first and last name as required, confirming the details to initiate the report generation process. Ultimately, the generated report is dispatched to their email for further examination and review.Textual Representation:
0. Generate Donation Report
1. Open Share The Meal App
2. Navigate to "You" Section
2.1 Access "Donation History"
2.1.1 Select "View All Past Donations"
2.1.1.1 View Donation Details
2.1.1.1.1 Locate "Generate Report" Button
2.1.1.1.1.1 Input First and Last Name
2.1.1.1.1.1.1 Confirm Details
3. Receive Report via Email
Plan 0: Perform steps 1, 2, and 3.
When required, execute step 3.
Plan 2: Do 2.1, 2.1.1, 2.1.1.1, 2.1.1.1.1, 2.1.1.1.1.1, 2.1.1.1.1.1.1
Diagram Representation:User 3: Charity Organization Representative
Video Link of User 3 doing Task 2:
https://drive.google.com/file/d/1w4JLbnQafe3EzFtQ7DROMc9JrestVXFK/view?usp=sharing
The charity organization representative accesses the Share The Meal app and proceeds to the "You" section of the interface. Within this section, they navigate to "Donation History" and select "See All" to access the comprehensive list of donations made. Spotting the "Generate Report" button in the upper right part of the screen, they click on it. Before generating the report, they additionally press within the donation history to view the details of specific donations. Afterward, they input their first and last name to personalize the report, initiating the report generation process. The finalized report is then sent to their email for record-keeping and analysis.Textual Representation:
0. Generate Donation Report
1. Open Share The Meal App
2. Navigate to "You" Section
2.1 Access "Donation History"
2.1.1 Select "View All Past Donations"
2.1.1.1 View Donation Details
2.1.1.1.1 Locate "Generate Report" Button
2.1.1.1.1.1 Input First and Last Name
2.1.1.1.1.1.1 Confirm Details
3. Receive Report via Email
Plan 0: Perform steps 1, 2, and 3.
When required, execute step 3.
Plan 2: Do 2.1, 2.1.1, 2.1.1.1, 2.1.1.1.1, 2.1.1.1.1.1, 2.1.1.1.1.1.1
Diagram Representation:Findings from the HTAs for Task 2
The Hierarchical Task Analysis (HTAs) derived from observing users generating donation reports using the Share The Meal app unveiled significant insights. Users consistently executed the task by navigating through the app's functionalities, including accessing donation history, reviewing specific donation details (observed in both user 2 and user 3), and initiating the report generation by tapping the designated button.
Additionally, the users' thought processes aligned remarkably well. Each user exhibited a systematic approach and a clear understanding of how to navigate the app effectively to generate their donation reports. This coherence indicated a shared comprehension of the app's interface and functionalities among the users.
Upon closer inspection of the HTAs, it was apparent that both user 2 and user 3 engaged in a similar step of viewing specific donation details within the donation history before proceeding to generate the report. This alignment underscored the importance of providing direct access to relevant details within the report generation interface for users who require this information.
Comparing the HTAs reiterated the potential enhancement in the process for users by integrating the option to view specific donation details directly within the report generation interface. Streamlining the process would simplify the user journey, eliminating the need for additional steps to access crucial information, and fostering a more seamless experience.
Therefore, the derived design requirements emphasize the significance of maintaining a unified interface while optimizing the report generation process. Integrating functionalities to view specific donation details directly within the report generation interface aligns with users' actions and thoughts, significantly enhancing the user experience within the Share The Meal app. This emphasis on direct access to relevant information stands as a key insight to consider for refining the app's functionalities based on user interaction observations.
https://drive.google.com/file/d/1vpvSmCd0J7LHXvBSZAgBsnYTU0VRSMu/view?usp=sharing
The university student initiates the process by opening the Share The Meal app and proceeding to the "You" section. From there, they navigate to "Donation History" and select the option to view all past donations. Once the list appears, they locate the "Generate Report" button situated in the upper right corner of the screen. After clicking the button, they're prompted to input their first and last name to personalize the report. Subsequently, upon confirming the details, the report is sent to their email address for access and reference.
0. Generate Donation Report
1. Open Share The Meal App
2. Navigate to "You" Section
2.1 Access "Donation History"
2.1.1 Select "View All Past Donations"
2.1.1.1 Locate "Generate Report" Button
2.1.1.1.1 Input First and Last Name
2.1.1.1.1.1 Confirm Details
3. Receive Report via Email
Plan 0: Perform steps 1, 2, and 3.
When required, execute step 3.
Plan 2: Do 2.1, 2.1.1, 2.1.1.1, 2.1.1.1.1, 2.1.1.1.1.1
Diagram Representation:

User 2: Global Citizen
https://drive.google.com/file/d/1WqLWrp5EKuZ_EsK33kR198J1lSzbXLeP/view?usp=sharing
0. Generate Donation Report
1. Open Share The Meal App
2. Navigate to "You" Section
2.1 Access "Donation History"
2.1.1 Select "View All Past Donations"
2.1.1.1 View Donation Details
2.1.1.1.1 Locate "Generate Report" Button
2.1.1.1.1.1 Input First and Last Name
2.1.1.1.1.1.1 Confirm Details
3. Receive Report via Email
Plan 0: Perform steps 1, 2, and 3.
When required, execute step 3.
Plan 2: Do 2.1, 2.1.1, 2.1.1.1, 2.1.1.1.1, 2.1.1.1.1.1, 2.1.1.1.1.1.1
User 3: Charity Organization Representative
https://drive.google.com/file/d/1w4JLbnQafe3EzFtQ7DROMc9JrestVXFK/view?usp=sharing
The charity organization representative accesses the Share The Meal app and proceeds to the "You" section of the interface. Within this section, they navigate to "Donation History" and select "See All" to access the comprehensive list of donations made. Spotting the "Generate Report" button in the upper right part of the screen, they click on it. Before generating the report, they additionally press within the donation history to view the details of specific donations. Afterward, they input their first and last name to personalize the report, initiating the report generation process. The finalized report is then sent to their email for record-keeping and analysis.
0. Generate Donation Report
1. Open Share The Meal App
2. Navigate to "You" Section
2.1 Access "Donation History"
2.1.1 Select "View All Past Donations"
2.1.1.1 View Donation Details
2.1.1.1.1 Locate "Generate Report" Button
2.1.1.1.1.1 Input First and Last Name
2.1.1.1.1.1.1 Confirm Details
3. Receive Report via Email
Plan 0: Perform steps 1, 2, and 3.
When required, execute step 3.
Plan 2: Do 2.1, 2.1.1, 2.1.1.1, 2.1.1.1.1, 2.1.1.1.1.1, 2.1.1.1.1.1.1
Findings from the HTAs for Task 2
HTA for Task 3 - Set notification to update on reminder or push notifications
User 1: University Student
Video Link of User 1 doing Task 3:
https://drive.google.com/file/d/1vsu1FIJR92pwdvrFNK65_bV3CxAYrDne/view?usp=sharing
User 1 initiates the Share The Meal app and accesses the account page. They proceed to the settings by selecting the icon on the right side. Within the "Reminders and Notifications" section, User 1 encounters three subsections: "Reminder," "Emails," and "Notifications." Opting for customization, the user activates the "Reminder" option and then returns to the main page. Subsequently, User 1 enters the "Emails" section to enable all available notifications. In this way, User 1 tailors their preferences for reminders and email notifications in the Share The Meal app. Textual Representation:
0. Set notification to update on reminder or push notifications
1. Open Share The Meal App
2. Click the setting icon
2.1 Click the "Reminders and notifications" button
2.2 View "Reminder" , "Emails" and "Notifications"
3. Select "Reminder"
3.1 Enable notification for "Reminder"
3.2 Select "Emails"
4. Enable the notification
Plan 0 : do 1-2-2.1-2.2-3-3.1-3.2-4
Plan 1 : do 1-2-2.1-2.2-3-4
Plan 2 : do 1-2-2.1-2.2-3-3.2-4
User 2: Global Citizen
Video Link for User 2 doing Task 3:
https://drive.google.com/file/d/16DSvpUWWzd45Jo8ohtm_bXmNBptKtB2i/view?usp=sharing
User 2 starts by launching the app and immediately goes to the "You" section. They then access the settings by clicking the corresponding button, directing them to the "Reminders and Notifications" segment. Within this section, User 2 finds three reminder categories: "Reminder," "Emails," and "Notifications." Opting to customize their settings, User 2 turns on the reminder feature for "Reminder." Following this, they go back to the main page and navigate to the "Notifications" section to activate notifications specifically for "Fundraising goals."Textual Representation:0. Set notification to update on reminder or push notifications1. Open Share The Meal App2. Click the setting icon 2.1 Click the "Reminders and notifications" button 2.2 View "Reminder" , "Emails" and "Notifications"3. Select "Reminder" 3.1 Enable notification for "Reminder" 3.2 Select "Push notifications" 3.3 Select "Fundraising goals"4. Enable the notificationPlan 0 : do 1-2-2.1-2.2-3-3.1-3.2-3.3-4Plan 1 : do 1-2-2.1-2.2-3-4Plan 2 : do 1-2-2.1-2.2-3.2-3.3-4
User 3: Charity Organization Representative
Video Link for User 3 doing Task 3:
https://drive.google.com/file/d/1vyM0haztsDm2S70SrM8LsknGem4HlUXB/view?usp=sharing
User 3 opens the app and goes to the setting in the “You” page. User 3 clicks the “Reminders and notifications” section and sees 3 choices on receiving notifications. User 3 chose “Reminders” and turned on the toggle. Then, set the frequency and also time of the day according to the preference. Next, User 3 goes back and turns all the notifications for “Email” and “Push notifications” one by one.Textual Representation:0. Set notification to update on reminder or push notifications1. Open Share The Meal App2. Click the setting icon 2.1 Click the "Reminders and notifications" button 2.2 View "Reminder" , "Emails" and "Notifications"3. Select "Reminder" 3.1 Enable notification for "Reminder" 3.2 Set the "Frequency" and "Time of day" 3.3 Select "Emails" 3.4 Enable notification for "Emails" 3.5 Select "Push notifications"4. Enable the notificationPlan 0 : do 1-2-2.1-2.2-3-3.1-3.2-3.3-3.4-3.5-5Plan 1 : do 1-2-2.1-2.2-3-3.2-4Plan 2 : do 1-2-2.1-2.2-3.3-4Plan 3 : 1-2-2.1-2.2-3.5-4
Findings from the HTAs for Task 3
From Task 3 that has been conducted, we can perceive that User 1, User 2, and User 3 are using different approaches in setting notifications to update on reminder or push notifications. All users start off in the same way by opening the app and click the setting icon at the "You" page.
The Share The Meal app interaction of User 1 consists of a series of actions targeted at configuring reminders and email notifications. The procedure stars with the launch of the app and the access to the account page. The user then accesses the settings by clicking on the icon on the right side of the display. User 1 encounter three unique subsections inside the "Reminders" and "Push notifications" section of the settings: "Reminder", "Emails" and "Push notifications". When the user chooses personalization, he selects the "Reminder" option and configures the frequency and time preferences before returning to the main page. Following that, User 1 further customizes their experience by going to the "Emails" area and enabling all accessible email notifications. In this manner, the customer gradually customizes their preferences.
User 2's engagement with the app involves a step-by-step process of customizing reminders and notifications. They commence by launching the app and swiftly navigating to the "You" section, indicating a direct entry into their personalized area. Subsequently, User 2 proceeds to the app's settings by clicking the corresponding button, leading them to the "Reminders" and "Push notification" segment. Within this section, three distinct categories- "Reminder", "Emails", and "Push notifications"- are identified. Opting for a personalized experience, User 2 activates the reminder feature under "Reminder" and efficiently returns to the main page. Continuing their customization efforts, User 2 then accesses the "Push notifications" section, where they specifically enable notifications related to "Fundraising goals". This methodical approach ensures that User 2 tailors their preferences for reminders and notifications, focusing on personal reminders and updates related to fundraising initiatives.
User 3's engagement with the app involves a sequential customization of notification settings. Initiating the process by the settings within the "You" page, they specifically navigate to the "Reminders" and "Push notifications" section, revealing multiple notifications choices. Opting for a focused approach, User 3 first configures the "Reminders" category by turning on the toggle and specifying the frequency and preferred time of day for receiving reminders. Demonstrating an attention to detail, they then navigate back to the main settings page to individually activate notifications for both "Email" and "Push notifications". This systematic progression ensures a finely tuned app experience for User 3, aligning notification preferences with their specific requirements and creating a personalized environment within the app.
User 1: University Student
https://drive.google.com/file/d/1vsu1FIJR92pwdvrFNK65_bV3CxAYrDne/view?usp=sharing
User 1 initiates the Share The Meal app and accesses the account page. They proceed to the settings by selecting the icon on the right side. Within the "Reminders and Notifications" section, User 1 encounters three subsections: "Reminder," "Emails," and "Notifications." Opting for customization, the user activates the "Reminder" option and then returns to the main page. Subsequently, User 1 enters the "Emails" section to enable all available notifications. In this way, User 1 tailors their preferences for reminders and email notifications in the Share The Meal app.

User 2: Global Citizen
https://drive.google.com/file/d/16DSvpUWWzd45Jo8ohtm_bXmNBptKtB2i/view?usp=sharing
User 2 starts by launching the app and immediately goes to the "You" section. They then access the settings by clicking the corresponding button, directing them to the "Reminders and Notifications" segment. Within this section, User 2 finds three reminder categories: "Reminder," "Emails," and "Notifications." Opting to customize their settings, User 2 turns on the reminder feature for "Reminder." Following this, they go back to the main page and navigate to the "Notifications" section to activate notifications specifically for "Fundraising goals."

User 3: Charity Organization Representative
https://drive.google.com/file/d/1vyM0haztsDm2S70SrM8LsknGem4HlUXB/view?usp=sharing
User 3 opens the app and goes to the setting in the “You” page. User 3 clicks the “Reminders and notifications” section and sees 3 choices on receiving notifications. User 3 chose “Reminders” and turned on the toggle. Then, set the frequency and also time of the day according to the preference. Next, User 3 goes back and turns all the notifications for “Email” and “Push notifications” one by one.


No comments:
Post a Comment